Revealing Wi-Fi Secrets: Accessing Passwords for Connected Networks in Windows/Linux
 3m, 6s
 2
2
09:24, 16.04.2024
While the standard graphic interfaces of Windows and Linux are rather designed for regular users, the functionality of both systems is not limited by the features offered within the graphic interfaces. Many helpful features are somewhat concealed and can only be accessed via the command line interface. Today, we want to reveal one of these secrets and show you, how you can access Wi-Fi passwords for connected networks in both Windows and Linux via the command line.
Windows
In Windows, the command line prompt is accessed through the cmd.exe. Many potentially useful features that haven’t been introduced in the GUI, can be accessed via this interface. In particular, if you have ever looked for a handy way to display all the passwords of Wi-Fi networks your device is and has ever been connected to, then cmd is exactly what can help you with it.
Before exploring how to use it for this task, it’s worth understanding how Windows records the networks you’ve connected to. Basically, Windows saves the network in the form of corresponding WLAN profiles which are then stored together with all the necessary details. Using appropriate commands will allow you to see the details on all the networks you’ve ever connected to.
- Run cmd as admin.
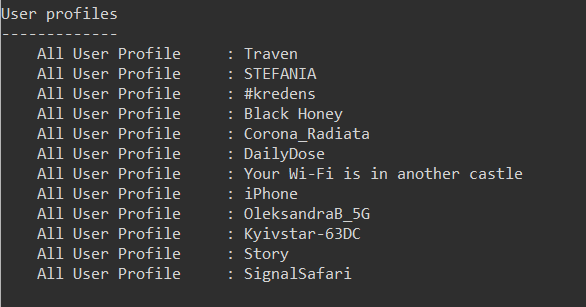
- Run the command:
netsh wlan show profileIt will display all stored Wi-Fi network connections.
- Copy the name of the WLAN profile that you want to learn more details about. Use the command netsh wlan show profile *your WLAN profile* key=clear inserting this name instead for *your WLAN profile*. For example:
netsh wlan show profile Traven key=clear
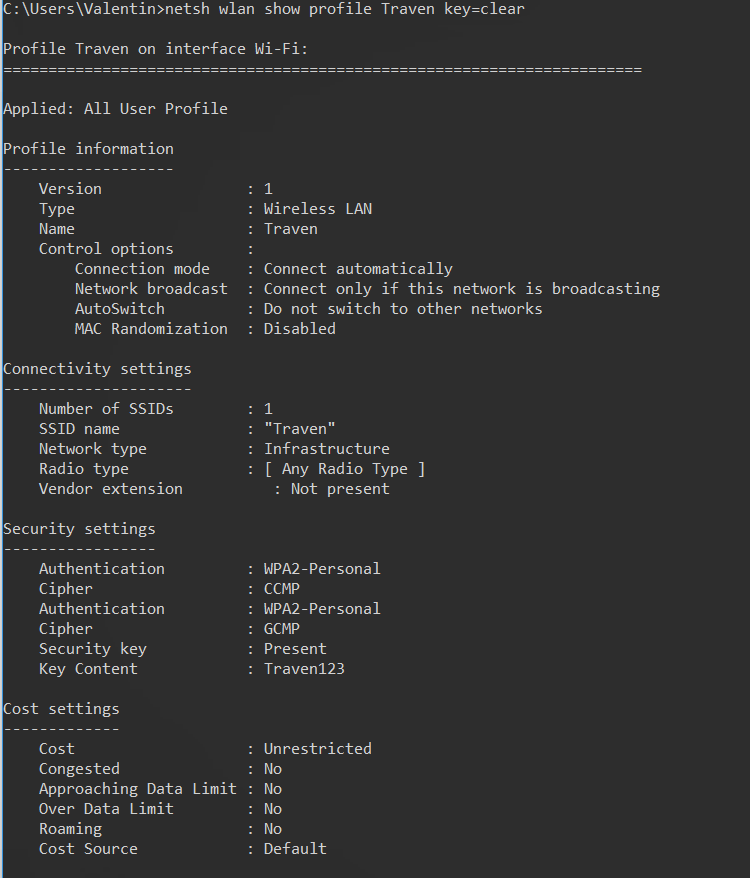
If a password is what interests you among other things, you can see it in Key content which you can find in the security section.
The interface can also be used to delete unneeded profiles. For this, type:
netsh wlan delete profile name=”ProfileName”
Linux
Similarly to Windows, in Linux WLAN profiles are stored and can be accessed through the terminal.
- Go to etc/NetworkManager/system-connections/
cd /etc/NetworkManager/system-connections/
This is the folder where WLAN profiles are stored. - Enter ls -a to see all the networks stored on your PC, including those hidden ones which is provided by the -a flag standing for “all”. Pick up the name you want to figure out more about and enter sudo cat WIFI_SSID_Name. The password of the network is to be found under psk=...
You can get detailed information about the files in the directory by typing sudo ls -l /etc/NetworkManager/system-connections/. Pay attention to -l, as it instructs the command to provide long-form information about the files and directories including file permissions, owner, group, file size, modification time, and the file or directory name.
A given network can be also removed with the command:
sudo rm /etc/NetworkManager/system-connections/NETWORK_NAME
To sum up
This is all you need to know to see the information about the Wi-Fi networks your device has ever connected whether it runs Windows or Linux operating systems, including the passwords you were probably wondering how to find for a long time. Besides that the interface can be used to perform various operations on existing profiles, among other things removal.
The use of the command prompt is pretty handy also because it works the same way on all systems. While different releases and versions of an OS can have significant differences when it comes to graphic interface, and you’ll have to spend time figuring out where this or that feature is to be found, by Googling or by relying on your intuition, the method described works the same regardless. We hope that the instructions provided were clear enough and wish you good luck. Thank you for your time!
Was this article helpful to you?
 Yes
Yes
 No
No
VPS popular offers
-22.2%


 Linux
Linux
€ 33 /mo
Billed annually
-8%
 Windows
€ 26.54 /mo
Billed annually
-10%
Linux
€ 25.85 /mo
Billed annually
-10%
Linux
€ 6.41 /mo
Billed annually
-8.8%
Windows
€ 46.67 /mo
Billed annually
-29.4%
Linux
€ 17 /mo
Billed annually
-9.5%
Windows
€ 74.49 /mo
Billed annually
-21.5%
Windows
€ 26 /mo
Billed annually
-10%
Linux
€ 135.49 /mo
Billed annually
-10%
Linux
€ 69.99 /mo
Billed annually